In the modern web, we no longer use static content. Now we display our contents dynamically. So it is very important to know how you can create dynamic HTML elements using JavaScript.
Nowadays, many websites show user-specific information on their pages. That means for different users, pages will look totally different.
This is only possible if you generate HTML documents on demand using JavaScript. To become a professional web developer, you must know how to do this.
In this article, I will show you the best methods to create dynamic HTML elements and how you can add attributes, CSS styles, and classes using JavaScript.
First, create an HTML and JavaScript file. Then load the JS file into your HTML document. You can load it in the old way at the end of the <body> tag or in a modern way at the <head> tag using async or defer.
If you want to know more about this, you can read this article on how to use async and defer in the script tag.
How to Create Dynamic HTML and CSS in JavaScript
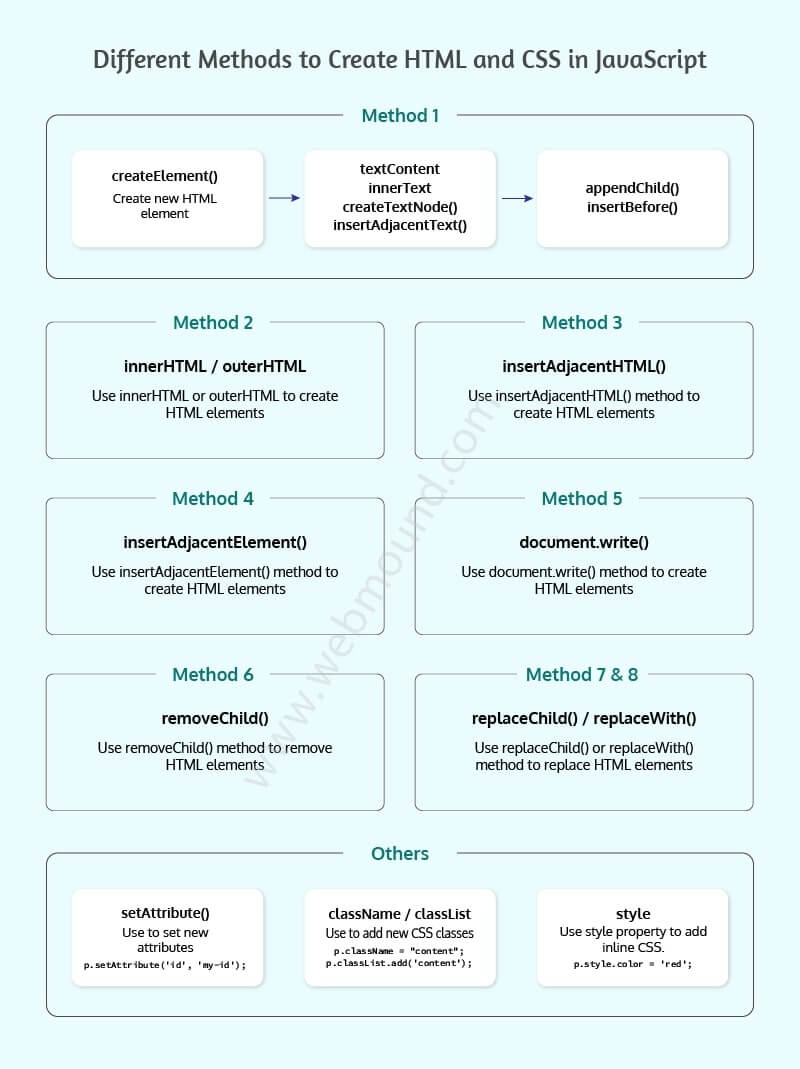
There are many ways to create dynamic HTML using JavaScript. These are the following methods that anyone can follow to generate HTML in plain JavaScript.
- Method 1: Create HTML element using
createElement()method.- Add text to your created element with
textContent,innerText,createTextNode()orinsertAdjacentText(). - Append your new HTML element to the document using
appendChild()orinsertBefore()methods.
- Add text to your created element with
- Method 2: HTML element can be created using
innerHTMLandouterHTML. - Method 3: You can insert an HTML string to a specific position using
insertAdjacentHTML()method. - Method 4: You can insert an HTML element using insertAdjacentElement() method at a specific position.
- Method 5: You can add or update HTML in a document using document.write().
- Method 6: Remove any HTML element using removeChild() method.
- Method 7 & 8: Replace an HTML element with replaceChild() or replaceWith() method.
- You can also add dynamic CSS class, styles, and attributes to you HTML elements.
Method 1
How to Use createElement() to Create HTML Element
Suppose you have a div with id root in your HTML document. You want to add dynamic HTML to this div.
          <h2>Dynamic HTML using JavaScript</h2>
<div id="root"></div>
First, you need to create the element you want to insert using createElement() method.
          const p = document.createElement('p');
// Create a <p> element
Here, I have created a paragraph <p> element using createElement() method and stored it in a constant p. You can create any HTML elements you want like div, ul, li, span, etc by passing their names as the first argument in this method.
At this point, it is an empty element. There is no content in it. So you have to add text in this paragraph element.
Add Dynamic Content to HTML Element in JavaScript
There are multiple ways to insert text into an HTML element. You can use textContent, innerText and insertAdjacentText() for this. Any one of them will work just fine.
I show you all of them. It is up to you which one you will choose.
Add Content Using textContent
Now I will add content to the paragraph element that we created in the previous section.
          p.textContent = "Hello World!!";
// <p>Hello World!!</p>

console.log(p.textContent);
// "Hello World!!"
HTML element has a property called textContent. Using this property you can set content to an element.
If an HTML element already contains text, you can get that text using
textContentproperty in JavaScript.
Add Content Using innerText
You can use the innerText property to add content to your elements. It works similarly to textContent property.
          p.innerText = "Hello World!!";
// <p>Hello World!!</p>

console.log(p.innerText);
// "Hello World!!"
Here, I am setting content to the paragraph element using innerText property. You also can access the existing content with this property in JavaScript.
Add Content Using insertAdjacentText()
The insertAdjacentText() method inserts text to an HTML element at a specific position. This method accepts 2 parameters.
The first parameter is the position where you want to insert your text and the second parameter is the actual text your want to insert.
In the second parameter, you can pass any text you need. But there are 4 values that you can use in the first parameter. These are:
beforebegin- It inserts the text before (outside) the selected element.beforeend- It inserts the text inside the selected element but after the last child.afterbegin- It inserts the text inside the selected element at the beginning as the first child.afterend- It inserts the text after (outside) the selected element.
          p.insertAdjacentText('beforebegin', 'Hello World!!');
// "Hello World!!"
// <p></p>
In the above example, I have selected the element that I created in the previous section. If you use beforebegin as the first argument, it will add the text before the <p> element.
Learn More: Parameter VS Argument in JavaScript
          p.insertAdjacentText('beforeend', 'Hello World!!');
// <p>Hello World!!</p>

p.insertAdjacentText('beforeend', ' Second text.');
// <p>Hello World!! Second text.</p>
When you use beforeend, it inserts the text inside the <p> element but at the end. At first, the paragraph element had no content so this method added the content.
But the second time, it added the text after the previous text.
          p.insertAdjacentText('afterbegin', 'Hello World!!');
// <p>Hello World!!</p>

p.insertAdjacentText('afterbegin', 'First text. ');
// <p>First text. Hello World!!</p>
The afterbegin works similarly but in the opposite direction. The first time, it adds the text inside the <p> element. But the second time, it adds the text before the previous text.
          p.insertAdjacentText('afterend', 'Hello World!!');
// <p></p>
// "Hello World!!"
When you use afterend, it does not insert the text inside <p> element. The text gets added after the <p> element.
Differenct Between textContent and innerText
It might look like textContent and innerText properties are completely similar. But there are a few differences that you should consider before choosing one over another.
- The
textContentreturns all contents including the child elements. But theinnerTextreturns all contents excepts<script>and<style>elements. It only shows human-readable texts. - The
textContentproperty also returns contents of elements that are hidden using CSS. But theinnerTextwill not return contents from hidden elements. It only gives the text which is visible on the screen.
Insert HTML Element to Document in JavaScript
After adding some content to our created HTML element, the next step is to append that element to the document. I will show you two methods to do that.
Use appendChild() to Append HTML Element
As we have seen before, our document has a div element with an id root. I will append the <p> element to that div.
          const root = document.getElementById('root');
root.appendChild(p);

// <div id="root">
// <p>Hello World!!</p>
// </div
First, I am selecting the div element using getElementById. Then I am passing <p> element to appendChild() method to append it to the div.
That's how you add append any HTML element to the document.
Use insertBefore() to Append HTML Element
You can use insertBefore() method to append any HTML element to the document. It has a different use case.
          <div id="parent">
    <p>Dummy content</p>
    <p id="child">Child element!!</p>
</div>
For example, you have a parent div which has multiple child elements. Now you want to insert another element before any child element.
In this scenario, you can use inserftBefore() method to achieve your requirements.
          const parent = document.getElementById('parent');
const child = document.getElementById('child');

parent.insertBefore(p, child);
This method accepts 2 parameters. The first one is the new element you want to append and the second is the child element. Your new element will be appended before this child element.
First, I am selecting the parent and child elements using getElementById. Then I am calling insertBefore() method on the parent element and passing our <p> element and the child.
After appending our new element to the document, HTML will look like this:
          <div id="parent">
    <p>Dummy content</p>
    <p>Hello World!!</p>
    <p id="child">Child element!!</p>
</div>
Method 2
Create HTML Element Using innerHTML and outerHTML
Using innerHTML property you can insert HTML directly without using createElement() method. This method is helpful if you have a complex HTML element with multiple child elements.
You can type your HTML inside JavaScript as you do in HTML files.
          <h2>Dynamic HTML using JavaScript</h2>
<div id="root">
    <p>Dummy content</p>
</div>
In this example, I will add HTML elements inside div element. You can use the following method to do so.
          const root = document.getElementById('root');
root.innerHTML = `
    <div class="container">
        <h3 class="title">Post Title</h3>
        <p class="summary">Lorem Ipsum is simply dummy text of the printing and typesetting industry.</p>
    </div>
`;
First, I am selecting the div. Then I am setting the HTML element as the innerHTML property value.
Usually, this method will override the existing elements that this div has. That means, it will remove the existing elements and then add the new elements.
Now HTML document will look like this:
          <h2>Dynamic HTML using JavaScript</h2>
<div id="root">
    <div class="container">
        <h3 class="title">Post Title</h3>
        <p class="summary">Lorem Ipsum is simply dummy text of the printing and typesetting industry.</p>
    </div>
</div>
If you want to have the previous elements along with the new ones, you just have to add a plus (+) sign before equal (=) in line number 2.
          const root = document.getElementById('root');
root.innerHTML += `
    <div class="container">
        <h3 class="title">Post Title</h3>
        <p class="summary">Lorem Ipsum is simply dummy text of the printing and typesetting industry.</p>
    </div>
`;
That's it. This appends the new element after the existing ones. So HTML document will look like this:
          <h2>Dynamic HTML using JavaScript</h2>
<div id="root">
    <p>Dummy content</p>
    <div class="container">
        <h3 class="title">Post Title</h3>
        <p class="summary">Lorem Ipsum is simply dummy text of the printing and typesetting industry.</p>
    </div>
</div>
If you use outerHTML to add HTML elements, it will remove the selected div with the id root and add the new elements.
          const root = document.getElementById('root');
root.outerHTML = `
    <div class="container">
        <h3 class="title">Post Title</h3>
        <p class="summary">Lorem Ipsum is simply dummy text of the printing and typesetting industry.</p>
    </div>
`;
This will remove the root element and add the new elements in that position. So the document will look like this:
          <h2>Dynamic HTML using JavaScript</h2>
<div class="container">
    <h3 class="title">Post Title</h3>
    <p class="summary">Lorem Ipsum is simply dummy text of the printing and typesetting industry.</p>
</div>
You can add plus (+) sign before equal (=) in line number 2 to keep the root element in the document. Then your new element will be added after the root element.
          const root = document.getElementById('root');
root.outerHTML += `
    <div class="container">
        <h3 class="title">Post Title</h3>
        <p class="summary">Lorem Ipsum is simply dummy text of the printing and typesetting industry.</p>
    </div>
`;
In this case, the HTML document will keep the root element and will look like this:
          <h2>Dynamic HTML using JavaScript</h2>
<div id="root">
    <p>Dummy content</p>
</div>
<div class="container">
    <h3 class="title">Post Title</h3>
    <p class="summary">Lorem Ipsum is simply dummy text of the printing and typesetting industry.</p>
</div>
Note:
root.innerHTMLwill return the child elements inside therootelement. Butroot.outerHTMLwill return the entirerootelement.
Method 3
Create HTML Element Using insertAdjacentHTML()
The insertAdjacentHTML() method accepts 2 parameters. The first parameter is the position where you want to insert the HTML element.
The second parameter represents the HTML code you want to insert. You have to pass your HTML code as a string.
NOTE: This method parses the string as HTML or XML.
You can pass 4 values as positions in the first parameter. These are:
beforebeginbeforeendafterbeginafterend
NOTE: We have discussed them in detail earlier in the insertAdjacentText() method section.
          const root = document.getElementById('root');
root.insertAdjacentHTML(
    'beforeend',
    '<h3 class="content">Using insertAdjacentHTML</h3>'
);

// <div id="root">
//     <h3>Using insertAdjacentHTML</h3>
// </div>
Here, I have selected an element from the DOM and called insertAdjacentHTML() method to insert my custom HTML element.
Method 4
Create HTML Element Using insertAdjacentElement()
Like insertAdjacentHTML() method insertAdjanectElement() method also accepts 2 parameters.
In the first parameter, it accepts the same 4 values that represent the position of the dynamic HTML element. These are: beforebegin, beforeend, afterbegin, and afterend.
The main difference between insertAdjacentHTML() and insertAdjacentElement() lays in the second parameter.
          const root = document.getElementById('root');

const h3 = document.createElement('h3');
h3.textContent = 'Using insertAdjacentElement';

root.insertAdjacentElement('beforeend', h3);

// <div id="root">
//     <h3>Using insertAdjacentElement</h3>
// </div>
The insertAdjacentHTML() method accepts HTML code as string but insertAdjacentElement() method accepts HTML element.
Here, I have created a h3 element and added text to it. Now I can pass this element to the insertAdjacentElement() method.
Method 5
How to Use document.write() to Create HTML Element
You can use document.write() method to write HTML code to the document. You have to pass your HTML as a string.
If you have added your <script> tag at the end of the <body> tag, you can add the following code in your JavaScript file.
document.write('<h3>Hello World!!!</h3>');
This code will insert the HTML element at the end of the document.
But if you have added your <script> tag in the <head> tag with async or defer attribute, you have to use the following code in your JavaScript file.
          document.open();
document.write('<h1>Hello World!!!</h1>');
document.close();
But the problem is that this will override the full document. That means it will remove all the previous elements from the document and then add the custom element.
NOTE: For this limitations,
document.write()method is not the recommended way to create HTML element.
Method 6
Remove HTML Element With removeChild() in JavaScript
You can remove any HTML element using removeChild() method. You need to pass the element to this method that you want to remove.
          const parent = document.getElementById('parent');
const child = document.getElementById('child');

let garbage = parent.removeChild(child);

console.log(garbage);
// <p id="child">Child element!!</p>
I have selected the parent element and child element that I want to remove. I can access removeChild() method on the parent element and pass the child to remove it.
That element will be removed from the document. This method also returns the removed element. You can store it in a variable if you need it for later use.
Method 7
Replace HTML Element With replaceChild() in JavaScript
The replaceChild() method is used to replace one element with another. To make it functional, you have to pass 2 elements in this method.
          <div id="parent">
    <div id="old">Old Element</div>
</div>
          const parent = document.getElementById('parent');
const oldElement = document.getElementById('old');

const newElement = document.createElement('p');
newElement.textContent = 'Hello World!!';

parent.replaceChild(newElement, oldElement);

// <div id="parent">
//     <p>Hello World!!</p>
// </div>
In the above example, I have created a new <p> element. It will replace the old element with the new one.
You have to pass the new element as the first argument and the old element as the second argument in replaceChild() method.
If the new element already exists somewhere in the document, it will first remove from that position.
          <p id="replace">Element to replace</p>

<div id="parent">
    <div id="old">Old Element</div>
</div>
          const parent = document.getElementById('parent');
const oldElement = document.getElementById('old');

const newElement = document.getElementById('replace');

parent.replaceChild(newElement, oldElement);
Here, I am selecting the new element which already exists in the document. The output of the HTML document will be like this:
          <div id="parent">
    <p id="replace">Element to replace</p>
</div>
Method 8
Replace HTML Element With replaceWith() in JavaScript
You can use replaceWith() method to replace one element with another. This method is the alternative to the replaceChild() method.
          const oldElement = document.getElementById('old');

const newElement = document.createElement('p');
newElement.textContent = 'Hello World!!';

oldElement.replaceWith(newElement);

// <div id="parent">
//     <p>Hello World!!</p>
// </div>
You have to call replaceWith() method on the old element that you want to replace and you have to pass the new element to the method as its argument.
Like replaceChild(), this method also removes the new element if it already exists in the document.
Others
Only creating HTML elements is not enough. Because you may need to add CSS classes, custom styles as well as some attributes to that element.
Now I will show how you can do that for your dynamic HTML elements.
How to Add Attribute in HTML Using JavaScript
The setAttribute() method is used to add attributes to an HTML element. This method accepts two parameters. The first one is the name of the attribute and the second one is the value of the attribute.
          const root = document.getElementById('root');
const p = document.createElement('p');
p.textContent = 'Hello World!!';

p.setAttribute('id', 'my-id');
p.setAttribute('title', 'Paragraph title');

root.appendChild(p);

// <div id="root">
//     <p id="my-id" title="Paragraph title">Hello World!!</p>
// </div>
Here, I have created the <p> element and added id and title attributes with their values. You can add as many attributes as you want.
There is another way to set attributes. You can set or update your attribute value by accessing its name on the element.
          p.id = "my-id";
p.title = "Updated paragraph title";
How to Add CSS Class in HTML Using JavaScript
Adding CSS class to an HTML element is very important. You can add class to your element in two ways.
          const root = document.getElementById('root');

const p = document.createElement('p');
p.textContent = 'Hello World!!';

p.className = 'text-center';

root.appendChild(p);

// <div>
//     <p class="text-center">Hello World!!</p>
// </div>
You can set the class using the className property. If you set the className property multiple times then this will remove the previous classes.
How can you add multiple classes?
          p.className = "text-center";
p.className = "text-center content";
// OR
p.className = "text-center";
p.className += " content";

// <p class="text-center content">Hello World!!</p>

console.log(p.className)
// "text-center content"
You can use any one of the following methods to add multiple classes to your dynamic HTML elements.
NOTE: You can get the class names using
classNameproperty.
There is another way to add CSS classes to HTML elements. You can use add() method to do so.
          p.classList.add('text-center');
p.classList.add('content');

// <p class="text-center content">Hello World!!</p>
In this way, you can add multiple classes one by one. This will not override the previous classes. The add() method by default insert classes one after another.
You can also remove classes if you want using the remove() method.
          p.classList.add('text-center');
p.classList.add('content');
p.classList.remove('text-center');

// <p class="content">Hello World!!</p>
Read also: How to Style HTML Textarea With CSS
How to Add CSS Style Using JavaScript
You can add inline CSS styles to your HTML element using the style property on that element.
          p.style.color = 'red';
p.style.fontSize = '20px';

// <p style="color: red; font-size: 20px">Hello World!!</p>
You can access style property on the element you want to add inline styles. After style property, you can define the CSS style name and set the value for that style as a string.
If the style name contains two words, you have to use the Camel case. Like,
fontSize,fontFamily,marginLeft,zIndexetc.
Conclusion
It was a complete guide to creating HTML elements using plain JavaScript. With these methods, you will be able to update your web page content dynamically.
Customized web pages are more engaging and user-friendly. That's why modern web pages always update their contents on demand.
You also know how to use JavaScript to add CSS classes, inline styles, and attributes to elements.
I hope from now on you will be able to create dynamic HTML elements in JavaScript for your website.
