Web servers set cookies in browsers when we visit websites. It is a very common technique to identify any user. That's why as a developer, you should know how to set and extract cookies from a request while developing a website server.
You can use Node.js and Express to set and get cookies or you can also use an external package to do it. I will show you both ways. Then you can choose which method you want to use in your project.
In this article, you learn everything about HTTP cookies. You will be able to store cookies inside a browser using the Node.js server. This is the complete list of topics that I will go through in detail:
- What is a cookie?
- Why and how should you use it?
- How to store cookies in the browser.
- How to create multiple cookies.
- Getting cookies from a request in NodeJS.
- How to clear cookies from the user's browser.
- How to provide security to the created cookies.
After reading this post, you will get everything you need to work with cookies in the Node.js and Express server.
What are Cookies?
A cookie is a small piece of information stored in the user's browser which is set by a web server when the user visits a website. It is used to identify the user's computer by extracting cookies inside the web server.
It is a very important tool used by big tech companies to track our activities on the web. According to our activities, they display advertisements in front of us.
We also use it for user authentication on a website. We need to use cookies and sessions for authentication. Both are ways to store information about a user.
The main difference is cookies are stored in the browsers and sessions are stored inside the website server.

How Cookies Work
When we visit a webpage, we send requests to the server. The server processes the request and sends a response. With the response, a server can send the cookies.
Browsers store those cookies in the cookies storage. Normally every browser has 3 types of storage.
- Local Storage.
- Session Storage.
- Cookies Storage.
Every cookie is associated with a website. When a website stores a cookie, only that website can use it.
Therefore, when you visit that website again, your browser will send all the cookies connected to the website automatically with every request.
Then the server can extract those cookies from the request to identify you. This is how a server understands whether you are logged in or not.
Why Should You Use Cookies?
After knowing about the cookie, you already can guess the usage of this. You can apply this technique for many purposes.
- It is used in login and registration. When you log in to your Facebook account and visit different pages, the server uses cookies to remember that you are logged in. Otherwise, we had to provide log-in credentials every time we change a web page.
- Tracks our activities on the web. Big companies store their cookies to see which websites we visit and try to analyze our interests. According to that, they display advertisements and promote their products to us.
- It is also useful to analyze the activities of the users on a website. For example, a server can determine how long a user stays on the website.
- A website can provide a better user experience. Because when we can identify our user's behavior and their interests, then we will be able to offer them customized products and services according to their interest.
There are very few but important usages of the cookies. Normally, we will store information for authentication and authorization for our web application.
Nowadays, websites also use JWT tokens for authenticating users instead of using the traditional method. Yet, they create cookies to store the JWT token in the browser.
Because it is safe to store the token in cookie storage than storing it in the local storage. The cookie provides more security. We will also talk about this topic in detail later in this post.
How to Set Cookies in Node.js Express
To set cookies using Node.js first you have to have a NodeJS server running. You can set up your server very easily with the Express framework.
You can go through our complete Node.js and Express setup with the TypeScript guide if you want to use TypeScript.
Step 1 - Project Setup and Run
Navigate to the folder where you want to store the source code of your Node.js server. Create the package.json file inside that folder by running the following command.
npm init -y
Now you have to install the necessary packages for your server. I will create a simple Express server with a few routes. Therefore, I have just installed 2 npm packages.
- Express - A Node.js server-side framework to create web servers.
- dotenv - It is a zero-dependency package to load environment variables from the
.envfile.
You can execute the following command to install those packages in your project.
npm install express dotenv
Now I will set up the server using the express framework and spin up the web server so that I can access different routes.
This is my simple web server code.
          const express = require('express');
const dotenv = require('dotenv');
const pageRoutes = require('./routes/pageRoute');

const app = express();

// Loading Environment Variables
dotenv.config();

// Routes
app.use(pageRoutes);

const PORT = process.env.PORT || 3000;

app.listen(PORT, () => {
    console.log(`Server is running at port ${PORT}`);
});
I have required all the packages in the server file. I also have a separate file pageRoute.js for adding routes. I am accessing the PORT from the process.env object.
This property is available because of the dotenv package. Using this package, you can set and use environment variables in Node.js from the .env file.
My server will listen at port 3000 after running this code.
Step 2 - Add Route and Endpoint
Let's add a route in the pageRoute.js file that will create the cookies. I will create the post route at /login path. When someone sends the post request on this path, it will create the cookie.
          // pageRoute.js

const express = require('express');

const router = express.Router();

router.post('/login', (req, res, next) => {
    res.send('Your are logged in');
});

module.exports = router;
Inside the /login route, I will create the cookies using res.setHeader() method.
Step 3 - Set a Cookie Using res.setHeader()
The setHeader() method is available in the response object provided by the Express framework. Right now, I will show you how to create a cookie manually.
This method takes 2 arguments. The first argument is the name of the header and the second argument is the value for the header.
To set a cookie, you have to pass Set-Cookie string as the header name. The value will also be a string. But you have to follow a format to make it a valid cookie.
          router.post('/login', (req, res, next) => {
    res.setHeader('Set-Cookie', 'isLoggedin=true');
    res.send('Your are logged in');
});
Every cookie is a key-value pair. So, it has two parts. One is key and another is value. When you give the header value in the second argument, you have to define both the key and value for the cookie.
You will separate this key and value with an equal (=) sign. Before the equal (=) sign is the key and after it is the value. You must follow this format.
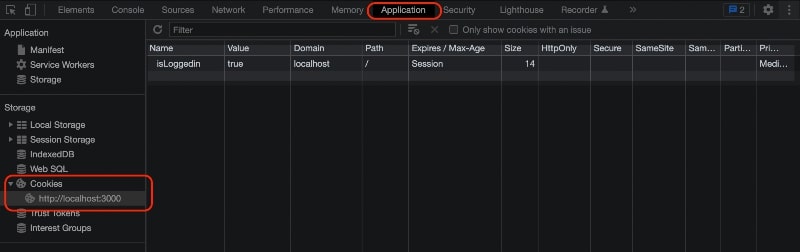
When you send the post request at this route from your browser and open the dev tool Application tab >> Cookies >> Domain URL, you will see the cookie.
As you can see, there are many options other than Name and Value like Domain, Path, Expire, HttpOnly, Secure, etc.
You can also set those options by using cookie attributes. Let's see those attributes and how to set them with the cookies.
Cookie Attributes
Attributes enable us to provide options for our cookies while creating them. There are many cookie attributes available for us. These are the most important attributes that you might need to use for your website.
Max-Age- This attribute takes a number in seconds to specify how long a cookie will be valid. For example, if you set 60 for Max-Age attribute, the browser will remove that cookie automatically after 60 seconds.Expires- It also specifies the duration of the cookie likeMax-Agebut the difference is it takes a date instead of seconds.Domain- It is used to define a domain name for which a cookie will be valid. The browser will only send that cookie with the requests at that domain.Path- This attribute specifies the path for which the cookie will be sent.HttpOnly- It forbids users from accessing cookies using JavaScript. Cookies that containHttpOnlyattribute can not be accessed throughdocument.cookieproperty.Secure- This attribute will set or send the cookie only when the request is made with thehttpsprotocol. That means the cookie will only work over an encrypted connection.SameSite- It controls when to send a cookie in case of cross-site requests. This attribute accepts 3 valuesStrict,Lax,Nonewith different functionalities.
We will see how to use these attributes while creating cookies in the later section.
How to Get Cookies in Node.js Express
You can easily access your cookies from the request object using req.headers.cookie property in your Express server. It will return all the cookies as a string.
isLoggedin=true; lang=js
If you have two cookies isLoggedin and lang in the request, it will return a string like this. Now you have to extract those cookies from this string.
You can convert this string into an object with the keys and values.
          router.get('/get-cookies', (req, res, next) => {
    let cookies = {};

    const cookiesArray = req.headers.cookie.split(';');

    cookiesArray.forEach((cookie) => {
        const [key, value] = cookie.trim().split('=');
        cookies[key] = value;
    });

    res.json(cookies);
});
Output:
          {
    isLoggedin: 'true',
    lang: 'js'
}
I am splitting the string using the split() method, after that creating the cookies object by looping over the array.
I am extracting all the cookies manually. But if you use an external package like cookie-parser, you will get a cookie object directly.
          app.use((req, res, next) => {
    let cookies = {};

    if (!req.headers.cookie) {
        next();
    }

    const cookiesArray = req.headers.cookie.split(';');

    cookiesArray.forEach((cookie) => {
        const [key, value] = cookie.trim().split('=');
        cookies[key] = value;
    });

    req.cookies = cookies;
    next();
});
You can use this middleware function in your server entry file to add the cookies object to the request. In this way, you don't have to extract cookies every time you need them. Now you will be able to access the cookies using req.cookies in your every route.
How to Clear Cookies in Node.js Express
Clearing cookies is very easy in Express. Inside a route, the response object has a method called clearCookie(). When you call this method with the name of a cookie, it removes that cookie.
          router.post('/logout', (req, res, next) => {
    res.clearCookie('isLoggedin');

    res.send('You are logged out');
});
I have a /logout route in which I am calling the res.clearCookie() method with isLoggedin cookie name. When I send a post request at this route, I will remove the isLoggedin cookie from the browser.
          router.post('/logout', (req, res, next) => {
    res.clearCookie('isLoggedin');
    res.clearCookie('lang');

    res.send('You are logged out');
});
You can also remove multiple cookies at the same time by calling this method multiple times. In this case, it will remove the isLoggedin and lang cookies from the browser.
Setting Cookies Using cookie-parser
Earlier we have seen how to set cookies manually without using any external package. If you want to make this process simple, I will suggest you use the cookie-parser package.
First, install this package by running the following command.
npm install cookie-parser
This package gives us a middleware function for the Express framework. Now I will require the function and register it as middleware using app.use() in the server.
          const express = require('express');
const dotenv = require('dotenv');
const cookieParser = require('cookie-parser');
const pageRoutes = require('./routes/pageRoute');

const app = express();

dotenv.config();

app.use(cookieParser());

// Routes
app.use(pageRoutes);

const PORT = process.env.PORT || 3000;

app.listen(PORT, () => {
    console.log(`Server is running at port ${PORT}`);
});
When we use cookieParser() middleware function in our project, this function adds a cookie() method in the response object.
Now inside a route, we can call this method res.cookie() to set a new cookie.
          router.post('/login', (req, res, next) => {
    res.cookie('isLoggedin', true);

    res.send('Your are logged in');
});
The res.cookie() method accepts 3 arguments. The first argument is the name of the cookie, the second is the value, and the third is an object.
Just call this method with the cookie name and value, and it will create the cookie for you. The third argument is optional. Using this argument you can set different attributes for the cookie.
Let's see how you can use those attributes.
How to Use Cookie Attributes
We have talked about attributes that we can use to configure our cookies. Now we will see how to use these attributes. First, I will show you how we can set those manually. Then we will set attributes using cookie-parser package.
Max-Age
          router.post('/login', (req, res, next) => {
    res.setHeader('Set-Cookie', 'isLoggedin=true; Max-Age=60');

    res.send('Your are logged in');
});
Expires
          router.post('/login', (req, res, next) => {
    const date = new Date();
    date.setHours(date.getHours() + 5);

    res.setHeader('Set-Cookie', `isLoggedin=true; Expires=${date}`);

    res.send('Your are logged in');
});
The Expires attributes take a date as its value. I am creating a date object and adding 5 hours to the date using JavaScript setHours() method.
Now you can set this date for the Expires attribute.
You can follow the same process to set other attributes: Domain, Path, HttpOnly, Secure, and SameSite etc.
          // Domain
res.setHeader('Set-Cookie', 'isLoggedin=true; Domain=example.com');

// Path
res.setHeader('Set-Cookie', 'isLoggedin=true; Path=/login');

// HttpOnly
res.setHeader('Set-Cookie', 'isLoggedin=true; HttpOnly');

// Secure
res.setHeader('Set-Cookie', 'isLoggedin=true; Secure');

// SameSite
res.setHeader('Set-Cookie', 'isLoggedin=true; SameSite=Strict');
You can also set multiple attributes at the same time.
          router.post('/login', (req, res, next) => {
    const date = new Date();
    date.setHours(date.getHours() + 5);

    res.setHeader(
        'Set-Cookie',
        `isLoggedin=true; Expires=${date}; Domain=example.com; HttpOnly; Secure; SameSite=Strict`
    );

    res.send('Your are logged in');
});
Now you know how to use attributes without using any external package. Now let's see how to do the same thing using cookie-parser package.
When we create a cookie with the cookie-parser package, we have to call the res.cookie() method. To set attributes, we have to use the third argument of this method.
          router.post('/login', (req, res, next) => {
    const date = new Date();
    date.setHours(date.getHours() + 5);

    res.cookie('isLoggedin', true, {
        secure: true,
        httpOnly: true,
        expires: date,
        domain: 'example.com',
        sameSite: 'strict',
    });

    res.send('Your are logged in');
});
We can pass an object in the third argument with all the attributes. As you see it is easy to create a cookie using this package. You can easily set different attributes to customize your cookie.
Getting Cookies Using cookie-parser
Like the setting, getting cookies using the cookie-parser package is also very easy. You don't have to extract them from a string. This package does all the heavy lifting for you and gives easy access to the cookie object.
          router.get('/get-cookies', (req, res, next) => {
    console.log(req.cookies.isLoggedin);
    // true

    res.json(req.cookies);
});
This package automatically extracts all the cookies from the request and creates an object. You can access that object using req.cookies inside every route.
Now you can get any cookie value by using its name on this object.
How to Set Multiple Cookies in Node.js
Many times we create more than one cookie at the same time. You can do that in Express. I will show you can create multiple cookies with or without any external package.
When you create your cookie using setHeader() method, you might think calling this method many times will create multiple cookies. But it won't.
If you call this method many times, the last one will override the others. It will only set the last cookie. So, how can you set more than one cookie?
          router.post('/login', (req, res, next) => {
    res.setHeader('Set-Cookie', [
        `isLoggedin=true; Expires=${date}; HttpOnly; Secure`,
        'lang=js; HttpOnly; Secure',
    ]);

    res.send('Your are logged in');
});
To set multiple cookies, you have to pass an array of cookies instead of a string. Inside this array, you can set as many cookies as you want.
Now let's see how to do the same thing using cookie-parser package.
When we are using this package, we can call the res.cookie() method many times to set multiple cookies.
          router.post('/login', (req, res, next) => {
    res.cookie('isLoggedin', true, {
        secure: true,
        httpOnly: true,
        expires: date,
        domain: 'example.com',
        sameSite: 'strict',
    });

    res.cookie('lang', 'javascript', {
        secure: true,
        httpOnly: true,
        domain: 'example.com',
        sameSite: 'strict',
    });

    res.send('Your are logged in');
});
I am calling this method 2 times to create isLoggedin and lang cookies. In this way, you can use this method for each cookie.
How to Secure Cookies From Hackers
Securing cookies is very important for any website. It is very common that hackers to steal other people's cookies to gain access to unauthorized pages.
Secure Attribute
But we can protect our cookies by using some attributes. In production, we must use the Secure attribute. It will ensure that our cookies are only sent over the encrypted connection.
If a website doesn't use an SSL certificate and https protocol, our server will not send the cookies.
HttpOnly Attribute
We also need to use the HttpOnly attribute. With this attribute, we forbid JavaScript code from accessing cookies. It protects our cookies from cross-site scripting attacks (XSS).
It is a very common attack to steal cookies. If hackers can not access our cookies using JavaScript code, they will not be able to steal them.
SameSite Attribute
Another useful attribute for cookie protection is SameSite. It controls when to send cookies with the cross-site requests. This attribute provides some protection against cross-site request forgery attacks (CSRF).
There are 3 values this attribute accepts:
Strict- When we useSameSite=Strictattribute with the cookie, the browser will send that cookie only for the same-site requests. If a different domain sends the request, no cookie with theSameSite=Strictattribute will be sent.Lax- The browser also doesn't send cookies for cross-site requests with this value. But if a user navigates to the original website from another website, cookies will be sent. This is the default value if noSameSiteattribute is set.None- The browser sends cookies for both cross-site and same-site requests. If you useSameSite=Nonefor your cookie, you have to specify theSecureattribute along with it.
Among these 3 values, None is less secure. Because anyone can send a request to the server from an external website and the browser will send the cookies with that request.
In this way, a hacker can easily access restricted information by stealing another user's cookies.
Conclusion
We use cookies to store information. But we should keep in mind that it is not meant to keep sensitive information like passwords. Because cookies are stored in the browser and can be manipulated.
We should keep basic information inside a cookie so that we can use it on the server to verify the user's identity.
In this article, I have discussed everything about cookies. You have seen how to set cookies in a Node.js Express server. Not only that, now you know how to extract and delete a cookie.
I hope you will be able to use cookies on your website securely by adding different attributes. Because those security measures can protect both your users and your website.